
First off, welcome to the Investment Dominator Real Estate CRM system! We are excited to help you scale your real estate investment business massively with this amazing system.
There are just a few things you need to set up initially to get started so…
Let’s get started!
Step 1 – Setup Your User Profile
First, log in to your Admin Console, the link to this is included in your Welcome/ Confirmation email.
Once you login, it should look like this:
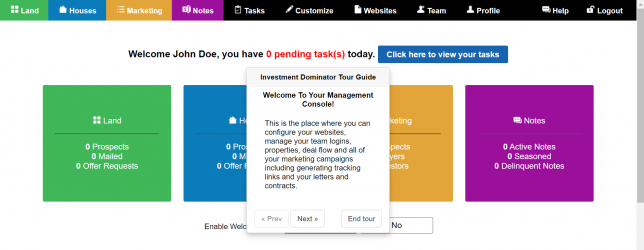
Please note: There is an interactive welcome tour that pops up when you first log in that is designed to get you accustomed to the system. Take a few moments to go through this tour by clicking the ‘Next’ button. Don’t worry it only takes 5 minutes 🙂
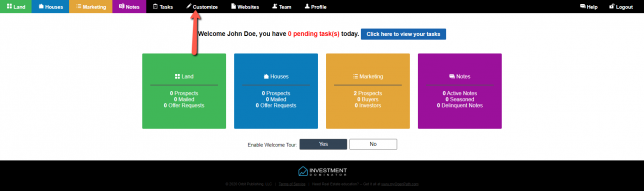
Let’s go ahead and take a look at the main navigation bar at the top of the screen, it should look like this:

From this navigation bar, you can access all the main parts of the program which include:
- Land = Your Land Property Records and Ownership Data
- Houses = House Property Records and Ownership Data
- Marketing = Your “Buyers List”
- Notes = Your Owner Financed Loans and Lease Purchases
- Tasks = Manage all of your tasks for both you and your team
- Customize = Customize both your system and websites
- Websites = Access your buying and selling websites
- Team = Manage team access into your system
- Profile = Manage your profile
- Help = For reference documents or to submit support tickets for any issues that come up
- Log out = Securely log out of the investment Dominator
So now that we have gotten familiar with the top navigation bar and you have a general understanding of what is accessible under each section, let’s go ahead and dive into the ‘Profile‘ tab.
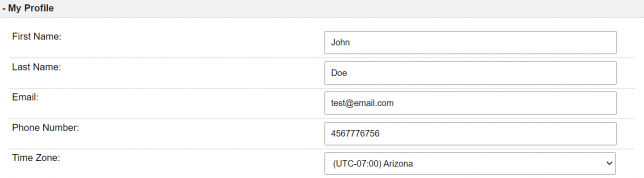
Step 2 – Creating Your Digital Signature
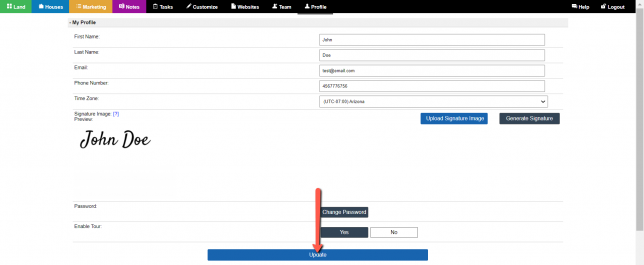
Click the ‘Profile‘ tab, then under the ‘My Profile‘ section go ahead and fill in some information about yourself. Start with your First Name, Last Name, Email, Phone Number, and Time Zone:
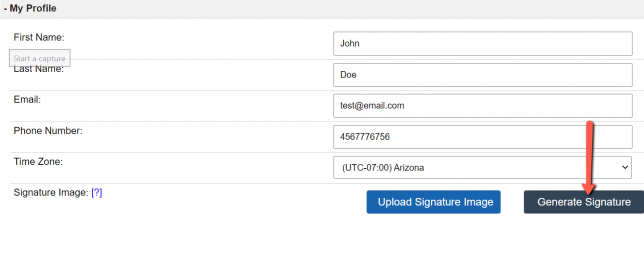
Ok, now it’s time to generate your marketing signature. We say marketing signature because this will only be used on your marketing letters, not on your contracts.
Don’t worry about having to use your trackpad, or mouse to create this either, simply click on the gray ‘Generate Signature‘ button on the bottom-right to generate your signature. Like this:
Simply enter your name to get started.
Then select a font style that best represents you.
Please note, if you choose to change the color to anything other than black there may be additional costs that you incur when you go to print your marketing letters later.
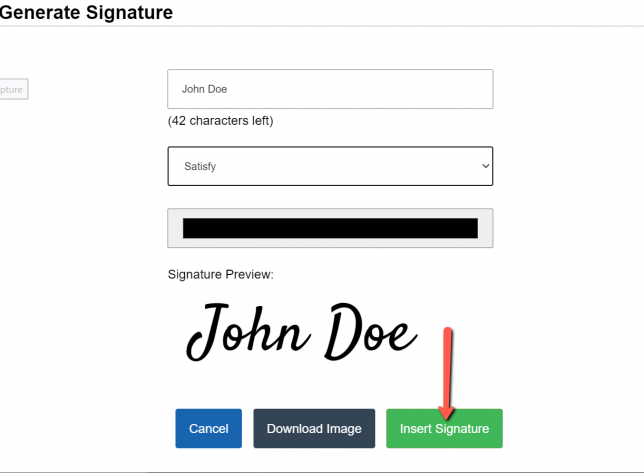
A signature preview should display and if all looks good click the green ‘Insert Signature‘ button to save your generated signature.
NOTE: This signature will only be used for marketing purposes.
Click on the blue ‘Update‘ button at the bottom of the page to save the changes:
Great work so far! We are now hitting the halfway point so let’s get down to business and finish strong!
Step 3 – Filling In Your Company Information
Remember that main menu bar from earlier let’s go ahead and take a look at this again, but this time our focus will be on the tab called ‘Customize‘.
To start let’s focus on the ‘Company Information’ section:
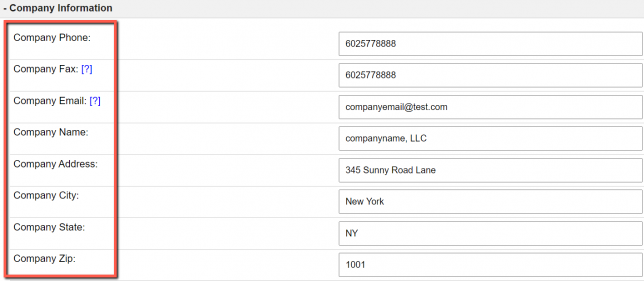
Let’s break this down by first filling out the fields that start with the word “Company”.
NOTE: The information you set under this area should be about your company not about you personally.
Information entered here is going to be used on your website as well as on your letters that get sent out to potential sellers, so let’s do this now in order to populate the system with the correct data for later.
Then when we take a look at the company name section there is one thing to note if you do not have a company name or LLC you can use a D.B.A (Doing Business As).
The ‘Offer Phone’ and ‘Offer Email’ fields are optional, however, we recommend that you use a phone number and email address for your offer package that is different from your main company phone and email.
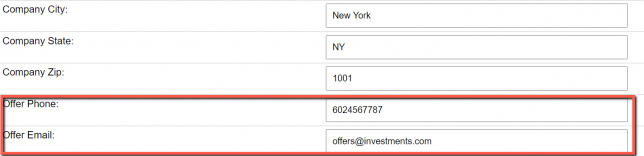
If you need to set up phone numbers for your business check out this article about how to use Ring Central as an affordable company phone system where you can easily set up multiple company phone numbers from one account.
Also, don’t forget to add your ‘Selling Email‘ address if you would like your sales messages to go to a different email address (this is recommended).

Please note: You’ll want to make sure that your buying information is different from your selling information because you want to make sure the people that sell you land contact a different phone/email than the people that buy land from you.
Next, set the ‘Company Time Zone‘, this is the timezone that your company is in and could be different than your personal time zone:

If you enter in something under the optional ‘Company Notes‘ field this will display on your ‘Buying Website‘ under the ‘Contact Us‘ page. For example, you could enter in something like: “We are open Monday through Friday 9 am-5 pm EST” and that text would then display on your Contact Us page of your Buying Website.
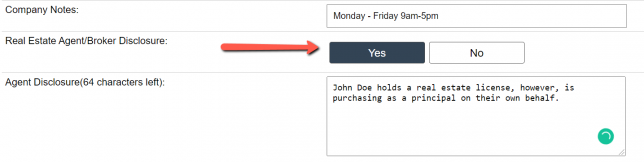
Under the ‘Real estate Agent/ Broker ‘ field select which applies to you:
If you are a Real Estate Agent or Broker select ‘Yes‘ and a short agent disclosure will appear on your marketing letters and on your Buying Website. If you are not a Real Estate Agent or Broker simply select ‘No‘.
Ok, once you are done click the blue ‘Update Site‘ button at the bottom of the page to save your changes.

Congratulations!
We have completed the quick start guide. It’s time now to load some property data into your system and get investing!
Import Data Into The System
- How To Import Your Land List
- How To Import Your House List
- Using Our Optional Data Feed Service To Generate A Lead List
- How To Import Your Marketing/ Buyers List
Sending Out Your First Mailing
- How to Generate Letters for Land Investing
- How to Setup a Direct Mail Campaign with a Printing Service
- How to Generate letters for House Investing
- REI PrintMail Integration Feature
- How to Create a Custom Letter Template for Mailing
- How to Add a Custom Logo on Neutral Letter
- How to Customize the PS Line on Neutral Letter Template
- How to Track Neutral Letter Conversion Rates
Generating An Offer Package
- How to Make an Offer for Land Investing
- How to Make an Offer for House Investing
- How to Manage Offer Campaign Part 1
- How to Make Offer Campaign Part 2
- How to Make Offer Campaign Part 3
- How to Customize Jacks Offer Templates
- How to Create a Custom 2nd Offer Cover Letter
- How to Properly Process an Offer Request
- How to Customize the Offer Contract for Land Agreement when Buying
Customizing Buying/Selling Sites
- How to Customize the Look of Your Built-in Websites
- How to Customize Buying and Selling Site Display Text
- How to Customize Property Listing Elements for Selling Site
- How to Customize Buying Site Website Banners
- How to Customize the Color Scheme of Buying Site
- How to Customize Selling Website Menu
- How to Customize Buying Site Menu