There could be a lot of reasons why you would like to remail to a county again that was already processed in mailed letter one status, but what about if we wanted to issue another mailing with an updated list of records.
Lets first identify what we are trying to accomplish
- Update records
- Create a new status
- Create a custom document
- Import updated records
- Send out mailed letter 2
From these steps we will begin to create an idea of everything we need and this tutorial will take everything step by step to ensure you can follow along easily.
Please note if at any time at all within the Investment Dominator you have made a mistake you can undo most actions made within the application, review our article here about this: https://user-guide.investmentdominator.com/how-to-undo-actions/
Step 1: Update records
We want to ensure that we do not mail to a person we already have mailed to in our mailed letter 1, people we made an offer to or purchased property. In order to do that you can scrub through your list which was previously uploaded and delete the contacts with which you do not want to work with.

A helpful tip with organization as well when updating the records you want to work with is adding a new tag to associate all the records with your mailed letter 2. For this demonstration I have chosen ML2 you can do whichever works for you and if you need more information on tagging review this article here: https://user-guide.investmentdominator.com/how-to-tag-records-and-execute-advanced-searches/
Then once you are done with filtering through your list just keep in mind the APN make sure this matches with the previous information before this is essential to ensure everything imports properly if you notice discrepancies please review this article here: https://user-guide.investmentdominator.com/how-to-properly-format-apns-and-zip-code-values-in-excel/
Step 2: Create A New Status
We have an article chain which goes over everything in more detail located here: https://user-guide.investmentdominator.com/how-to-manage-offer-campaign-part-2/ . This will explain how to create a new status but in this article I will highlight the key information.
Go to the Customize section of the Investment Dominator then click on ‘Custom stages and Statuses’
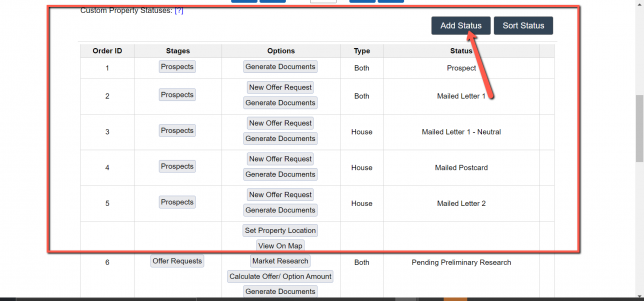
Then click on Add Status
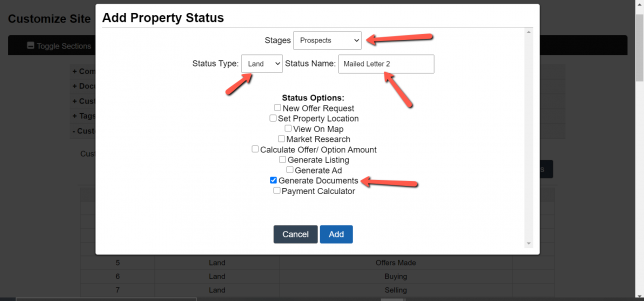
From there click the appropriate settings like shown above Then once done click Add.
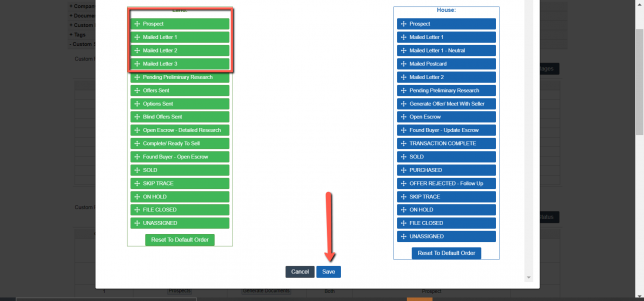
Then sort your status like so the most important part of this is to ensure prospect is at the top and your new mailed letter 2 comes after mailed letter 1. Then hit Save.
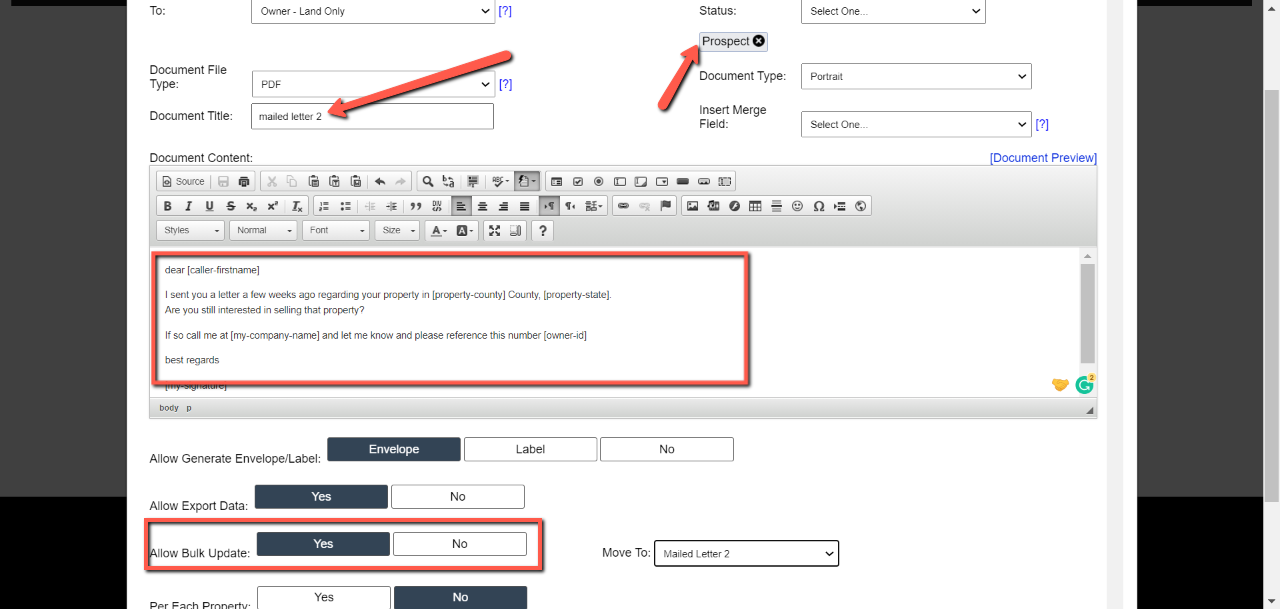
Step 3: Create A New Custom Document
Just like the example before we have an article that goes over this in detail which can be found here: https://user-guide.investmentdominator.com/how-to-manage-offer-campaign-part-3/
Proceed to the customize section of the Investment Dominator then go to ‘Custom Documents’ then click ‘Add Document’.

For more detail on the creation of the document you can review the article listed, but follow what’s on the picture above and make sure to turn on allow ‘Bulk Update’ this will prompt the Move To section from that select ‘Mailed letter 2‘.
Step 4: Import Updated records
So going back to what we did on step 1 the next step after creating this document is to take our CSV and upload it into the Investment Dominator, but there are some things we want to change from our normal process.
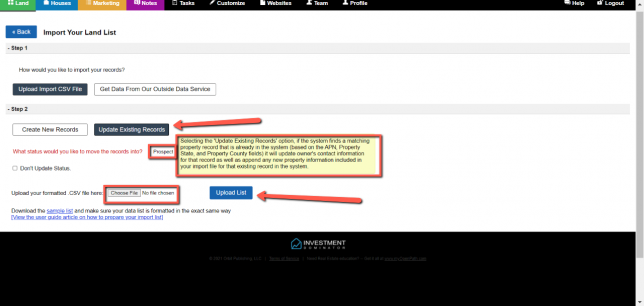
Go to the import section of your Investment dominator and this time take your updated list and click on ‘Update Existing Records’. this short prompt in yellow will also highlight some key items that need to match in order for this to work. Go ahead and upload your list then you should be good to go to our last step.
Step 5: Send Out Mailed Letter 2
So now that you have completed the following the last thing to do to complete your second mailing is to send them out and the key for this step is to not generate a campaign. Since you are using custom documents you are going to need to use the generate documents button within the land tab.

The reason for this is so we can use our custom documents the way we intended to have them work so we can send them straight to mailed letter 2.
It will ask you to choose the records which you want to work with so if you did our tagging earlier you should search for tag then click all records within it.
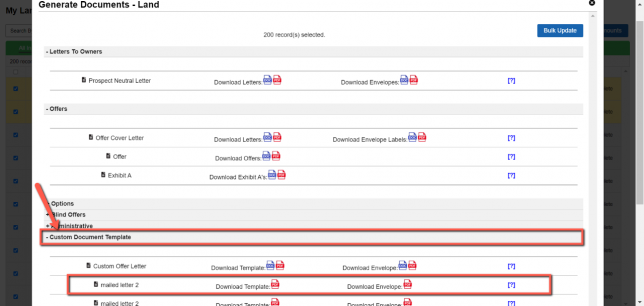
Then because of the step we did earlier for our custom documents then the bulk update happens after sending out mailing they should be pushed to Mailed Letter 2 instead of 1.