
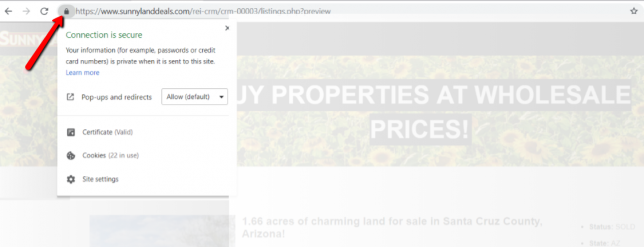
Once you start using custom domains (recommend) for your Buying and Selling websites you’ll want to install an SSL certificate for that custom domain. More and more internet browsers, search engines, and virus scan software promote the use of the secured https protocol and without having an SSL certificate some web visitors will see unsecured connection disclaimer when they visit your websites.
How To Generate A SSL Certificate?
We provide you with two free SSL certificates, one for your Buying Site and one for your Selling Site. To install the free certificate first configure your custom domains by following the instructions posted here.
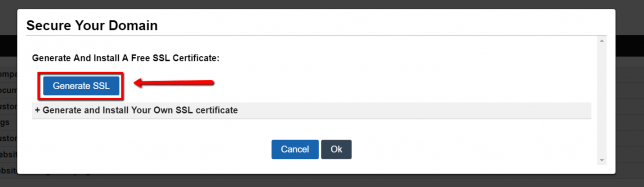
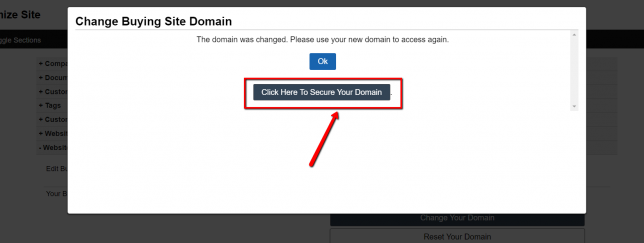
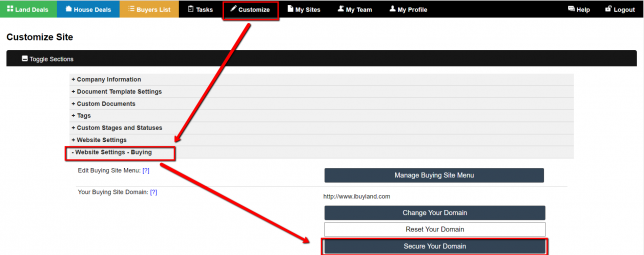
Once your custom domain has been set, click the button that says ‘Click Here To Secure Your Domain‘.

Then click the ‘Generate SSL‘ button.
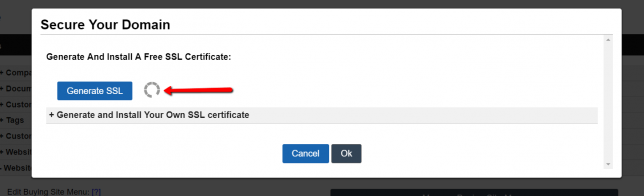
It will take a few minutes for the SSL to generate and install and in the time period you will see an animated loading .gif.
Note: If you are getting an error message when doing this step. Please wait 10-15 minutes and try again. If that doesn’t help, please go ahead and submit a ticket.
How To Generate and Install Your Own SSL (OPTIONAL)
Even though we give you the option to generate a free SSL certificate, you can also generate and install one for yourself.
To do this follow this 3-step process…
STEP 1 – GET THE CSR: First, you need to generate a .cert file and in order to do this, you need a .csr file from us that contains some required information.
Click either the ‘Click Here To Secure Your Domain‘ button on the confirmation page of the Change Domain screen, or the ‘Secure Your Domain‘ button under ‘Customize> Website Settings – Buying‘ or the ‘Customize> Website Settings – Selling‘ screen.
Click the ‘Generate and Install Your Own SSL Certificate‘ section to toggle that area open.
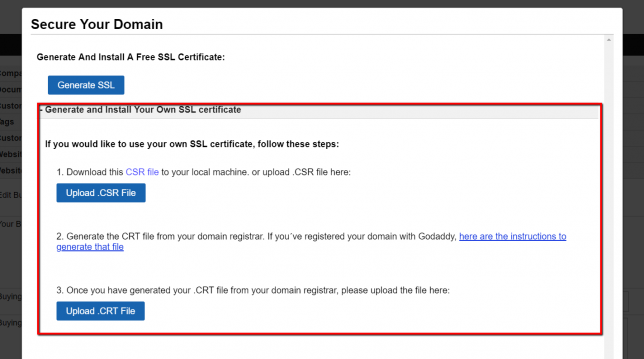
Click the ‘CSR file‘ link in step 1 to generate and download the Certificate Signing Request (CSR) file.
STEP 2) GENERATE THE CERT FILE: Using the .csr file that we provide to you, you can now generate the .cert file by purchasing a SSL certificate from a 3rd party provider like GoDaddy. (NOTE: If you are not technically inclined, we recommend that you go with goDaddy for this step as they can help you generate the certificate over the phone vs. other providers only give you a self-service set of instructions that you need to follow.)
Generating SSL With GoDaddy:
Below we have referenced the instructions for generating the .cert file with goDaddy depending on which type of SSL certificate you have purchased with them.
| Type | Generating SSL – Next steps (Instructional Reference) |
|---|---|
| goDaddy Standard Assurance SSL certificate | Request an SSL certificate (Standard Assurance) |
| goDaddy Deluxe or Extended Validation certificates | Request an SSL certificate (Deluxe or Extended Validation) |
STEP 3) INSTALL THE SSL: Click the ‘Upload .CRT File‘ button under step 3 to install the SSL certificate on to your account.

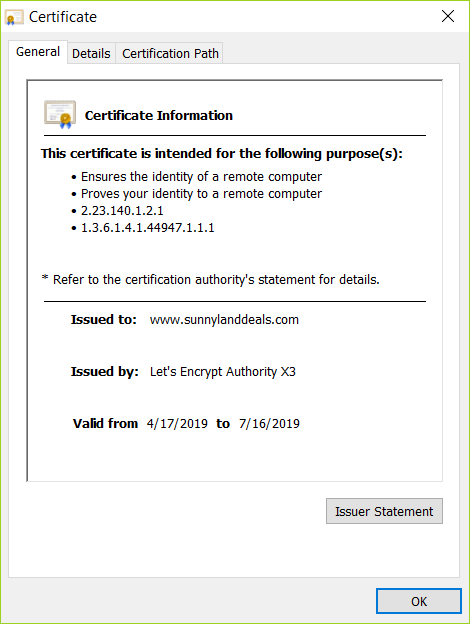
Once the certificate has been installed you can go to the https:// version of your website to view the secure connection and certificate.

NOTE: SSL Certificates are domain specific, so if you have a custom Buying Site and Selling Site domain as we recommend, you will need to install an SSL for both custom domains.